Integration 3 of 4
Background: Pasting in Fields and Scripts
GoZync just needs a couple of fields in your tables. Please add these fields exactly as they are in our sample files and don't change their names.
You'll also paste in a folder of scripts. Like the fields, most of these come in without requiring any modification. There is one script you'll want to change: more on that below.
Step 3.1: Adding a new table to your mobile file
Pasting in the gz table.
Open WorxMobile and copy the gz table, pasting it into your mobile file. The table requires no modification and no records. You do not need to do this in your hosted file.
If you don't have FileMaker Advanced, and can't copy and paste tables, we're happy to do this step for you. Send your mobile file to help@geistinteractive.com or get in touch if it's too big to email.
Step 3.2: Add required fields
You'll need to add a couple fields to your tables to get GoZync to work.
The fields are listed below. If you have FileMaker Advanced you can simply copy and paste these fields from one of GoZync's example files (be sure to copy the hosted fields from the hosted example file, the mobile ones from mobile).
If you don't have Advanced, just recreate the fields in your table, paying special attention to the field's type and auto-enter definition (if any). Or get in touch; we offer implementation packages to wire this up for you.
And while you need these fields in your tables, you DON'T want them on your sync layouts.
Hosted.
The hosted tables require two new fields; copy these fields from WorxHosted.fmp12.
gz_id_ListOF
gz_ModTimeStamp
The "gz_id_ListOF" field will lose its definition when pasted into your file if your primary key field has a different name than the file you copied it from. Redefine it manually by changing its type to "Summary > List Of", pointed to your table's primary key field (the same field you used in linking the table to GoZync on the GoZyncMobile graph).
Mobile.
Your mobile tables require four GoZync fields:
gz_ModTimeStamp
gz_Send
gz_LatestAction
gz_TimeStampZynced
Copy these from WorxMobile.fmp12 (our mobile example file). These fields should require no modification after being pasted.
Modification of related records.
If the table you're syncing is the parent to related records, take a moment to read about how GoZync considers a record "changed" as you may need to add some some scripts so changes to related records still trigger a record to sync.
Step 3.3: Required Scripts (Your Mobile File)
Pasting custom functions.
Copy/paste these three custom functions from WorxMobile into your mobile file: URLScheme, IsNativeApp, and __GoZyncMobile__. This must be done before copy/pasting scripts to your mobile file.
Editing custom functions requires FileMaker Pro Advanced. If you don't have access to Advanced, feel free to reach out and we'll be glad to do this step for you.
Pasting scripts.
Again, open one of GoZync sample mobile files (like WorxMobile.fmp12) and in scripts you'll see a folder called "GoZync".
Be sure that the example file you're copying from is in the same folder as your mobile file and GoZyncMobile.fmp12
Then copy that "GoZync" script folder and paste it into your mobile file. If you don't have FileMaker Advanced you can import this folder of scripts by clicking the "import" icon in the lower right of the Manage Scripts window in your mobile file.
You only need to edit one of these scripts, "Zync - Is a new version permitted". Toward the beginning of that script we go to a layout based on the primary TO you're syncing. Edit the script so you're going to the right layout. You can return to this script later to add additional branches for other TOs you may be syncing in the same file.
Note that the script "Zync It - This Table..." will be one of your go-to scripts for sync. You can call it without a script parameter if the Table Occurrence (TO) name of the layout you call it from matched the name of one of your sync TOs in GoZyncMobile (without the gzm_... prefix). Otherwise pass in the TO name from GoZyncMobile as a script parameter. Example:
Your TO in GoZyncMobile is "gzm_Contact" but the layout in your mobile file is based on a TO named "People". Call the script "Zync It - This Table..." passing in a parameter of "Contact". You wouldn't need a parameter if the layout in your mobile file were based on a TO named "Contact".
Your Upon Opening Scripts.
You'll also want to modify the upon opening script of your hosted file so that it doesn't run when the file is opened on the server: without this modification, your whole opening routine will run during the Perform Script on Server sessions. This can slow things down and unduly tax your server.
So if you're file doesn't already have a start-up script, copy the one from WorxHosted and paste it into your file (it's a script called "Startup"). Then select "Script Triggers" from the File / File Options menu and call that script as an "OnFirstWindowOpen" trigger.
If you already have a script being called on FirstWindowOpen, copy the first three lines from our script "Startup" in WorxHosted and add these at the beginning of your startup script:
If [PatternCount ( Get ( ApplicationVersion ) ; "Server" )]
ExitScript[]
End If
Step 3.4: Required Scripts (Your Hosted File)
Pasting scripts into your hosted file.
Open the hosted sample files (WorxHosted.fmp12) and in scripts you'll see a folder called "GoZync".
Be sure that the example file you're copying from is in the same folder as your hosted file.
Now copy that folder and paste it into your hosted file. If you don't have FileMaker Advanced you can import the folder of scripts by clicking the "import" icon in the lower right of the Manage Scripts window in your mobile file.
Once you have these scripts in your hosted file. Open GoZyncMobile and edit the script "PSOS Config" in GoZyncMobile. Find the comment "Call the script "GoZync Call from GZM" in your hosted file" and point the next Perform Script line at the script "GoZync Call from GZM" that you just pasted into your hosted file. =)
Step 3.5: Edit the Go To Related Records Scripts in GoZyncMobile and in Your Hosted File.
There is one script in each file you'll need to edit. Learn what needs to be changed here: Set Up Go To Related Records.
Step 3.6: UUIDs
Convert your primary keys to UUIDs.
Each table you're going to Zync, both on the mobile and hosted side needs its primary keys converted to UUIDs.
For more on the rationale here and details on what UUIDs are, read our article on UUIDs.
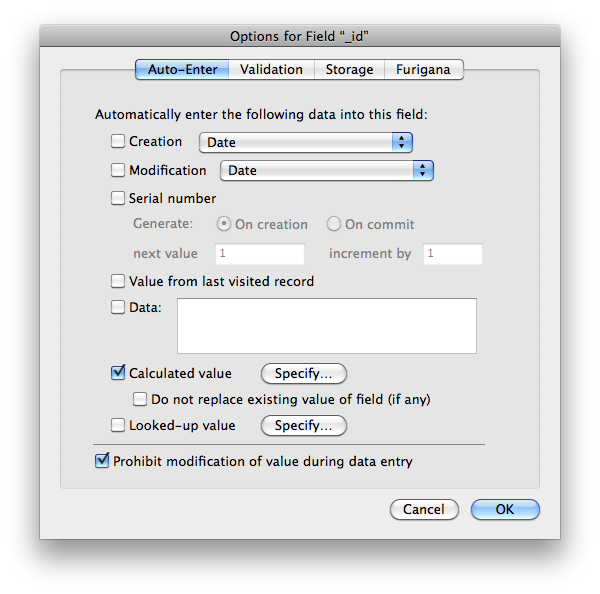
If you're already down with UUIDs, change your primary keys to Text fields with an auto-enter calc of Get(UUID). Uncheck "Do not replace existing value..." and check "Prohibit modification..."
Take your existing ID field and...
1. Turn it into a text field (you may have had it as a number originally).
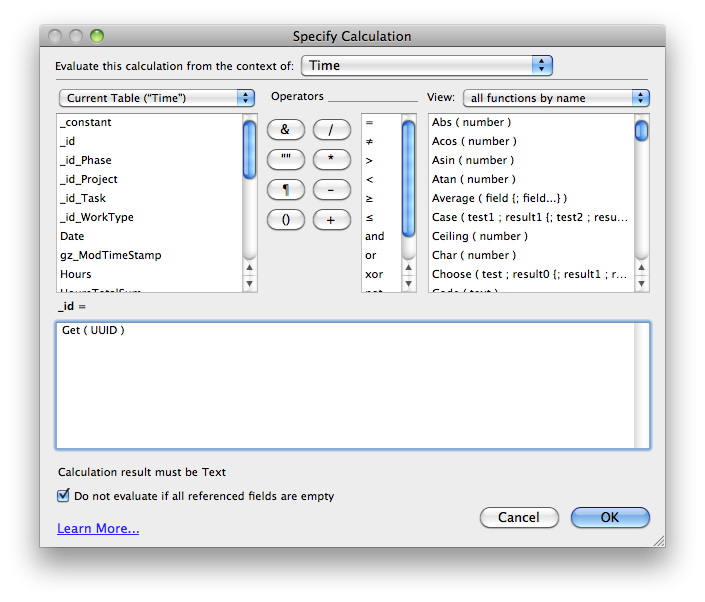
2. Add an auto-enter calc. Click "Options" and then "Specify" next to "Calculated value". Enter the following as the calc definition:
Get ( UUID )
Your calc should look like this:
3. Set it to not be modifiable. Click "OK" on the screen above and make sure your auto-enter options are set like this:
Be sure to do this in both your mobile and hosted files. And if you're creating these fields just for sync, be sure they're indexed (in field options, click storage and either check "Automatically create indexes...")
Check your work
Head over to GoZyncHosted and visit the Configuration tab again: click "refresh" and see if your fields check out. If they don't, click on the caution icon beside them to see what's wrong.
Now click on the checkbox area in the "more" column: if you've done everything there click "done".
Next...
Move on to the next step.
Now you can move on to the last step. Continue to step 4 of 4
Or return to the Integration Overview.

